State management is one of the most important aspects of building scalable and maintainable applications. In Flutter, one of the most popular tools for state management is the BLoC (Business Logic Component) pattern. If you’re new to Flutter or state management concepts, this blog post will guide you through the basics of BLoC, complete with code snippets to help you get started.
What is BLoC?
The BLoC pattern is a design pattern that separates business logic from the user interface. It ensures that:
- Your app’s UI remains clean and focused only on displaying data.
- Business logic can be tested independently of the UI.
- Code becomes more reusable and maintainable.
BLoC uses Streams to manage state and communication between different layers of your app.
How BLoC Works?
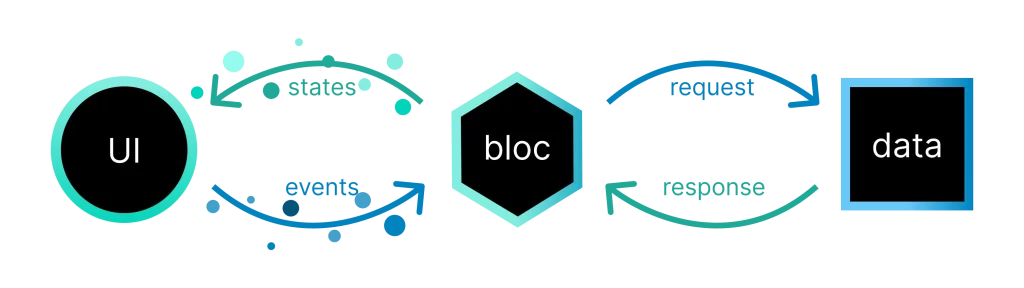
BLoC is a state management solution that revolves around the concepts of events and states. Here’s a step-by-step explanation of how it works:
- Events: Events represent the actions or triggers in your app, such as a button press or an API response. These events are dispatched to the BLoC.
- BLoC Logic: The BLoC receives the events and processes them based on your business logic. It determines the corresponding state change for each event.
- States: States represent the app’s data or UI status. The BLoC emits new states after processing events.
- UI Updates: The UI listens to the emitted states and rebuilds itself accordingly.
This flow ensures a clear separation of concerns, making your app scalable and maintainable.
What is Cubit?
Cubit is a simplified version of BLoC. It is part of the BLoC library and provides a more direct way to manage state without the need for events. Unlike BLoC, where you explicitly define events and handle them, Cubit focuses solely on emitting new states.
How Cubit Works?
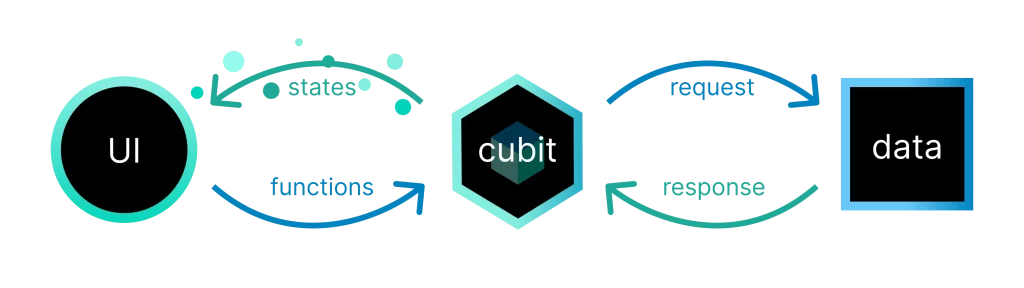
A Cubit manages a single state and provides methods to update it. When a method is called, the Cubit emits a new state. Here’s an example:
import 'package:flutter_bloc/flutter_bloc.dart';

class CounterCubit extends Cubit<int> {
  CounterCubit() : super(0);

  void increment() => emit(state + 1);
  void decrement() => emit(state - 1);
}
When to Use Cubit vs. BLoC?
- Use Cubit:
- When your app’s logic is straightforward.
- If you want to reduce boilerplate code.
- For small to medium-sized applications.
- Use BLoC:
- When you need to handle complex logic with multiple events.
- If you require a clear separation of concerns.
- For large applications where maintaining scalability is crucial.
In essence, Cubit simplifies state management for simpler cases, while BLoC offers more structure and flexibility for complex scenarios.
Setting Up Flutter BLoC
To start using BLoC in your Flutter project, you need to add the following dependencies in your pubspec.yaml file:
dependencies:
  flutter_bloc: <latest>
  bloc: <latest>
  equatable: <latest>
Run the command to get the packages:
flutter pub getUnderstanding the BLoC Architecture
At its core, the BLoC architecture consists of:
- Event: Represents an action or input from the user.
- State: Represents the UI’s data and status.
- BLoC: The component that manages the business logic by handling events and emitting new states.
Example Scenario
Let’s create a simple counter app using BLoC. The app has two buttons: Increment and Decrement, and a text widget to display the current count.
Step 1: Create the Counter Events
Events are the actions that trigger changes in your app’s state. In our counter app, we’ll have two events:
import 'package:equatable/equatable.dart';

abstract class CounterEvent extends Equatable {
  @override
  List<Object?> get props => [];
}

class Increment extends CounterEvent {}
class Decrement extends CounterEvent {}
The Equatable package helps ensure efficient comparison of event instances.
Step 2: Create the Counter States
States represent the data that your UI displays. For simplicity, we’ll use an integer to represent the current count:
import 'package:equatable/equatable.dart';

class CounterState extends Equatable {
  final int count;

  const CounterState(this.count);

  @override
  List<Object?> get props => [count];
}
Step 3: Create the Counter BLoC
The BLoC takes in events and outputs states. Here is the implementation:
import 'package:flutter_bloc/flutter_bloc.dart';
import 'counter_event.dart';
import 'counter_state.dart';

class CounterBloc extends Bloc<CounterEvent, CounterState> {
  CounterBloc() : super(const CounterState(0)) {
    on<Increment>((event, emit) => emit(CounterState(state.count + 1)));
    on<Decrement>((event, emit) => emit(CounterState(state.count - 1)));
  }
}
The on<Event> method listens for specific events and updates the state accordingly.
Step 4: Integrate BLoC into the UI
Wrap your app with the BlocProvider to make the BLoC accessible to the widget tree.
import 'package:flutter/material.dart';
import 'package:flutter_bloc/flutter_bloc.dart';
import 'counter_bloc.dart';
import 'counter_event.dart';
import 'counter_state.dart';

void main() {
  runApp(const MyApp());
}

class MyApp extends StatelessWidget {
  const MyApp({super.key});

  @override
  Widget build(BuildContext context) {
    return MaterialApp(
      home: BlocProvider(
        create: (_) => CounterBloc(),
        child: const CounterPage(),
      ),
    );
  }
}

class CounterPage extends StatelessWidget {
  const CounterPage({super.key});

  @override
  Widget build(BuildContext context) {
    return Scaffold(
      appBar: AppBar(title: const Text('Flutter BLoC Counter')),
      body: Center(
        child: BlocBuilder<CounterBloc, CounterState>(
          builder: (context, state) {
            return Text('Count: ${state.count}', style: const TextStyle(fontSize: 24));
          },
        ),
      ),
      floatingActionButton: Column(
        mainAxisAlignment: MainAxisAlignment.end,
        children: [
          FloatingActionButton(
            onPressed: () => context.read<CounterBloc>().add(Increment()),
            child: const Icon(Icons.add),
          ),
          const SizedBox(height: 8),
          FloatingActionButton(
            onPressed: () => context.read<CounterBloc>().add(Decrement()),
            child: const Icon(Icons.remove),
          ),
        ],
      ),
    );
  }
}
Understanding BLoC Widgets
1. BlocProvider
BlocProvider is used to provide a BLoC or Cubit to the widget tree. It ensures that the BLoC is accessible to all child widgets.
BlocProvider(
  create: (_) => CounterBloc(),
  child: CounterPage(),
)
2. BlocBuilder
BlocBuilder is used to rebuild the UI in response to state changes. It takes a builder function that has access to the current state.
BlocBuilder<CounterBloc, CounterState>(
  builder: (context, state) {
    return Text('Count: ${state.count}');
  },
)
4. BlocConsumer
BlocConsumer combines BlocBuilder and BlocListener. It allows you to rebuild the UI and perform side effects in a single widget.
BlocConsumer<CounterBloc, CounterState>(
  listener: (context, state) {
    if (state.count == 10) {
      ScaffoldMessenger.of(context).showSnackBar(
        SnackBar(content: Text('Count reached 10!')),
      );
    }
  },
  builder: (context, state) {
    return Text('Count: ${state.count}');
  },
)
Step 5: Test the App
Run the app, and you’ll see the counter update as you press the buttons. The BlocBuilder widget rebuilds the UI whenever the state changes.
Advantages of Using BLoC
- Separation of Concerns: Keeps the UI and business logic separate.
- Scalability: Suitable for large applications.
- Testability: You can write unit tests for your BLoC logic without involving the UI.
Example App Using Cubit
Let’s create a simple counter app using Cubit. The app has two buttons: Increment and Decrement, and a text widget to display the current count.
Step 1: Create the Counter Cubit
The Cubit class manages the state and provides methods to update it. Here’s the implementation:
import 'package:flutter_bloc/flutter_bloc.dart';

class CounterCubit extends Cubit<int> {
  CounterCubit() : super(0);

  void increment() => emit(state + 1);
  void decrement() => emit(state - 1);
}
Step 2: Integrate Cubit into the UI
Wrap your app with the BlocProvider to make the Cubit accessible to the widget tree.
import 'package:flutter/material.dart';
import 'package:flutter_bloc/flutter_bloc.dart';
import 'counter_cubit.dart';

void main() {
  runApp(const MyApp());
}

class MyApp extends StatelessWidget {
  const MyApp({super.key});

  @override
  Widget build(BuildContext context) {
    return MaterialApp(
      home: BlocProvider(
        create: (_) => CounterCubit(),
        child: const CounterPage(),
      ),
    );
  }
}

class CounterPage extends StatelessWidget {
  const CounterPage({super.key});

  @override
  Widget build(BuildContext context) {
    return Scaffold(
      appBar: AppBar(title: const Text('Flutter Cubit Counter')),
      body: Center(
        child: BlocBuilder<CounterCubit, int>(
          builder: (context, state) {
            return Text('Count: $state', style: const TextStyle(fontSize: 24));
          },
        ),
      ),
      floatingActionButton: Column(
        mainAxisAlignment: MainAxisAlignment.end,
        children: [
          FloatingActionButton(
            onPressed: () => context.read<CounterCubit>().increment(),
            child: const Icon(Icons.add),
          ),
          const SizedBox(height: 8),
          FloatingActionButton(
            onPressed: () => context.read<CounterCubit>().decrement(),
            child: const Icon(Icons.remove),
          ),
        ],
      ),
    );
  }
}
Step 3: Run the App
Run the app, and you’ll see the counter update as you press the buttons. The BlocBuilder widget rebuilds the UI whenever the state changes.
Advantages of Using Cubit
- Reduced Boilerplate: Simplifies state management by eliminating the need for events.
- Ease of Use: Perfect for simple to medium complexity use cases.
- Flexibility: Can be used in scenarios where BLoC might feel too heavy
Conclusion
The BLoC pattern and Cubit are powerful ways to manage state in your Flutter applications. By understanding their core concepts, you can build clean and maintainable apps. Widgets like BlocProvider, BlocBuilder, BlocListener, and BlocConsumer make integrating these tools into your app straightforward and efficient.
If you have any questions or suggestions, feel free to leave a comment below. Happy coding!
Important Announcement
We launched a new Flutter learning program “Flutter Community Learning BD”. In this program we will teach you Flutter as per your requested topic. Join our Discord server for attend this program.